Getting Started
All Aerial transformation is mainly done in 4 steps:
-
Include dependency
-
Create requirements document
-
Configure Cucumber code generation
-
Run JUnit test
Including Aerial as Dependency
Aerial is provided as Maven dependency and can be included using the construction like:
| <dependency>
<groupId>com.github.mkolisnyk</groupId>
<artifactId>aerial</artifactId>
<version>0.0.1</version>
</dependency>
|
or for Gradle:
| 'com.github.mkolisnyk:aerial:0.0.1'
|
Document Structure
Each Aerial document has the structure like:
| < Entire document description >
[Input Ref: <Name>
<Input Data Table>
]
Feature: < Feature Name >
< Feature description >
Case: < Case Name >
< Case Description >
Action:
< Action text >
Input: [ <Reference Name> |
< Input Data Table > ]
On Success:
< Actions in case of success >
On Failure:
< Actions in case of error >
Pre-requisites:
< Pre-requisites steps >
Additional Scenarios:
< Explicitly defined custom Cucumber scenarios >
|
Feature Section
| Description | Topmost section of the document. Groups multiple cases and scenarios. Directly maps to Cucumber features during generation |
| Parent Section | Entire Document |
| Multiple Entries | Yes |
| Mandatory | No |
| If Not Specified | If not defined only document description is allowed |
Input Ref Section
This section is targeted to use external definitions for Input sections. The structure is the same as for Input section except it also uses the name attribute to identify the reference uniquely.
Case Section
| Description | Contains specific case within the feature. Maps to group of Cucumber scenarios |
| Parent Section | Feature |
| Multiple Entries | Yes |
| Mandatory | No |
| If Not Specified | If not specified the Additional Scenarios section is allowed |
Pre-requisites
| Description | Contains test scenario pre-conditions. Belongs to each specific Case Section. |
| Parent Section | Case |
| Multiple Entries | No |
| Mandatory | No |
| If Not Specified | If empty, no pre-conditions are defined |
Action
| Description | Contains instructions responsible for main scenario actions before verification section |
| Parent Section | Case |
| Multiple Entries | No |
| Mandatory | Yes |
| If Not Specified | The validation will fail |
Input
| Description | Contains the table of input value descriptions being used within specific case for Action, On Success, On Failure and Pre-Requisites sections |
| Parent Section | Case |
| Multiple Entries | No |
| Mandatory | Yes |
| If Not Specified | The validation will fail |
On Success
| Description | Contains the set of instructions to be used in case of positive test scenarios |
| Parent Section | Case |
| Multiple Entries | No |
| Mandatory | Yes |
| If Not Specified | The validation will fail |
On Failure
| Description | Contains the set of instructions to be used in case of negative test scenarios |
| Parent Section | Case |
| Multiple Entries | No |
| Mandatory | Yes |
| If Not Specified | The validation will fail |
Additional Scenarios
| Description | Contains plain Cucumber scenarios to be used in addition to scenarios generated from data in Case section |
| Parent Section | Feature |
| Multiple Entries | Yes |
| Mandatory | No |
| If Not Specified | Only generated scenarios will be used |
Input Data Description
Input data is specific section which contains input values definitions with the rules how they should be validated. This section is core part of data generation. Here is some example of input section:
| Input:
| Name | Type | Value |
| Test | Int | [0;100) |
|
This section defines single integer parameter named Test which acceptable values are from 0 (inclusively) to 100 (exclusively). So, Aerial will generate scenarios for different inputs for this parameter.
Input Section Structure
Input section is represented as the table with the following columns:
| Column Name | Description |
|---|---|
| Name | Contains the name of the field |
| Type | Defines the type of the field. The test data will be generated based on the input type |
| Value | Identifies rule the current field should meet in order to be of acceptable value |
| Condition | Identifies boolean condition when the Value is applied |
| Unique | Flag identifying whether the value of this field should be unique in this scenario. This is needed for specific scenario generation |
| Mandatory | Flag identifying whether the value of this field should be mandatory (cannot be empty). This is needed for mandatory values scenario generation |
Data Types in Use and Acceptable Value Patterns
The most complicated and important part of this table is supported data types and value pattern to be used for generation. Currently the following data types are supported:
-
Int - numeric value
-
Date - any formatted date
-
String - text string
-
Enum - text string where each item is delimited with ; (semi-colon) character
Depending on data type we should use appropriate patterns.
Numeric Value Patterns
| Pattern | Description | Example |
|---|---|---|
| <Any explicit value> | Explicitly defined value. It means that this field can accept only value like this | 9 |
| [A;B] or [A;B) or (A;B] or (A;B) | Range value patterns. Depending on bracket types the range can include or exclude corner value. Square bracket indicates inclusive range while round bracket excludes corner value | [0, 10) |
Date Value Patterns
| Pattern | Description | Example |
|---|---|---|
| <single date pattern> | Uses explicit date pattern for single date. For test data generation purpose there would be current date used | dd-MM-yyyy |
| [A;B], Format: < Date Format > | Format which accepts date range from start to end point. Depending on bracket type the range can be exclusive or inclusive. The range values should have the same format as it’s defined after the Format keyword | [01-01-2000;02-10-2010), Format: dd-MM-yyyy |
String Value Patterns
Usually string acceptable value rules are defined using regular expression. It means that text value should match some specific regular expression pattern.
Input/Output Sources
Input Sources
| Source | Description | Parameters Specified |
|---|---|---|
| File | Indicates that input Aerial document is read from file system | Root directory where to take files from. Additionally files can be specified by mask to filter out unnecessary documents |
Output Sources
| Source | Description | Parameters Specified |
|---|---|---|
| File | Indicates that generated Cucumber features are written into text files. This is the main output type as it is targeted to Cucumber which mainly supports files |
Java Annotations
@Aerial
Main annotation identifying Aerial generation attributes. This annotation is set for test class which should be JUnit runnable. So, initially the class should look like:
| package com.github.mkolisnyk.aerial;
import org.junit.runner.RunWith;
import com.github.mkolisnyk.aerial.annotations.Aerial;
import com.github.mkolisnyk.aerial.core.AerialRunner;
import com.github.mkolisnyk.aerial.core.params.AerialSourceType;
import cucumber.api.CucumberOptions;
@RunWith(AerialRunner.class)
public class AerialRunnerTest {
}
|
Thus, we target JUnit to run tests using AerialRunner class which will drive Cucumber features generation with further Cucumber run. After that we’re ready to add @Aerial annotation. Here is an example of generator configuration targeted to read requirement documents from files located in the src/test/resources folder and write generated files into ./output/ folder:
| package com.github.mkolisnyk.aerial;
import org.junit.runner.RunWith;
import com.github.mkolisnyk.aerial.annotations.Aerial;
import com.github.mkolisnyk.aerial.core.AerialRunner;
import com.github.mkolisnyk.aerial.core.params.AerialSourceType;
import cucumber.api.CucumberOptions;
@Aerial(
inputType = AerialSourceType.FILE,
source = "src/test/resources",
additionalParams = { "" },
destination = "output/")
@RunWith(AerialRunner.class)
public class AerialRunnerTest {
}
|
The last part is to add CucumberOptions annotation to point Cucumber where to take the input from:
| package com.github.mkolisnyk.aerial;
import org.junit.runner.RunWith;
import com.github.mkolisnyk.aerial.annotations.Aerial;
import com.github.mkolisnyk.aerial.core.AerialRunner;
import com.github.mkolisnyk.aerial.core.params.AerialSourceType;
import cucumber.api.CucumberOptions;
@CucumberOptions(
format = {"html:target/cucumber-html-report",
"json:target/cucumber.json",
"pretty:target/cucumber-pretty.txt",
"usage:target/cucumber-usage.json"
},
features = {"output/" },
glue = {"com/github/mkolisnyk/aerial" },
tags = { }
)
@Aerial(
inputType = AerialSourceType.FILE,
source = "src/test/resources",
additionalParams = { "" },
destination = "output/")
@RunWith(AerialRunner.class)
public class AerialRunnerTest {
}
|
@AerialBeforeSuite and @AerialAfterSuite
As it was mentioned before the AerialRunner is wrapper on Cucumber JUnit runner class. So, all annotations applicable to Cucumber runner are applicable there. But there may be a need to perform some actions before and/or after any code generation or tests execution. For this purpose there’re dedicated annotations named @AerialBeforeSuite and @AerialAfterSuite correspondingly. They are assigned to methods which are supposed to be executed before and after entire suite run. With these annotations the above example can be appended like this:
| package com.github.mkolisnyk.aerial;
import org.junit.runner.RunWith;
import com.github.mkolisnyk.aerial.annotations.Aerial;
import com.github.mkolisnyk.aerial.core.AerialRunner;
import com.github.mkolisnyk.aerial.core.params.AerialSourceType;
import cucumber.api.CucumberOptions;
@CucumberOptions(
format = {"html:target/cucumber-html-report",
"json:target/cucumber.json",
"pretty:target/cucumber-pretty.txt",
"usage:target/cucumber-usage.json"
},
features = {"output/" },
glue = {"com/github/mkolisnyk/aerial" },
tags = { }
)
@Aerial(
inputType = AerialSourceType.FILE,
source = "src/test/resources",
additionalParams = { "" },
destination = "output/")
@RunWith(AerialRunner.class)
public class AerialRunnerTest {
@AerialBeforeSuite
public static void setUp() {
System.out.println("setUp");
}
@AerialAfterSuite
public static void tearDown() {
System.out.println("tearDown");
}
}
|
Using References for Input Data
Since version 0.0.6
In some cases the same input data description may be applied to multiple cases. Mainly it is related to cases which operate with the same input values but check some specific flows. In order to minimize duplication in test scenarios there was Input Ref feature introduced.
Imagine we have document with multiple cases operating with the same set of data:
| Feature: Sample Feature
Case: Sample Test
Action:
Sample action
Input:
    | Name | Type | Value   |
    | Test | Int  | [0;100) |
On Success:
This is what we see on success
On Failure:
This is what we see on error
Pre-requisites:
These are our pre-requisites
Case: Another Sample Test
Action:
Sample alternative action
Input:
| Name | Type | Value |
| Test | Int | [0;100) |
On Success:
Some alternative results on success
On Failure:
Some alternative results on error
Pre-requisites:
These are our pre-requisites
|
As it is seen from the above example we have 2 cases which operate with the same set of input data. If for any occasion we need to update the input data we need to do it in 2 places. And if the data is really related to the same input form or at least to the same input we always should do this as soon as we change something in the input. In order to minimize such duplication we can add global input definition and each case just uses reference to it. So, using this feature we can modify our requirements document like this:
| Input Ref: Test Data
| Name | Type | Value |
| Test | Int | [0;100) |
Feature: Sample Feature
Case: Sample Test
Action:
Sample action
Input: Test Data
On Success:
This is what we see on success
On Failure:
This is what we see on error
Pre-requisites:
These are our pre-requisites
Case: Another Sample Test
Action:
Sample alternative action
Input: Test Data
On Success:
Some alternative results on success
On Failure:
Some alternative results on error
Pre-requisites:
These are our pre-requisites
|
Pay attention to new Input Ref: section at the top level of the document hierarchy. It contains global definition for the input. The name of this section (which goes right after Input Ref: keyword) is used then as reference in any Input section. So, the modified document does the same as the original one. When we have many input data definitions which are widely used we get an advantage and at the same time we don’t lose document structure and visibility.
Using archetypes
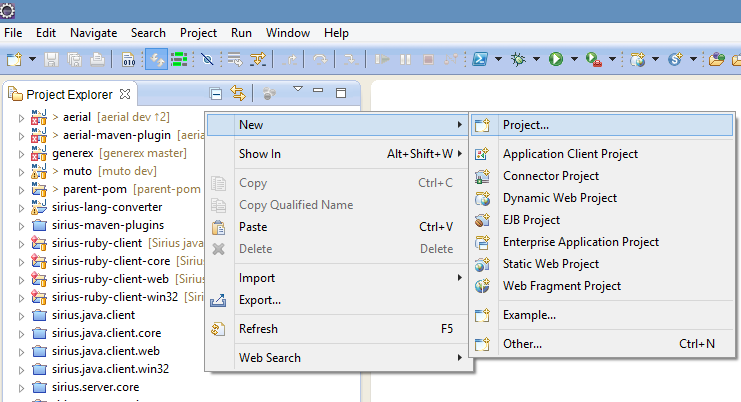
For several project types there are dedicated archetypes to simplify projects creation. Simple project using archetype is created in several steps:
Step 1: Create New Project
Step 2: Select Maven Project
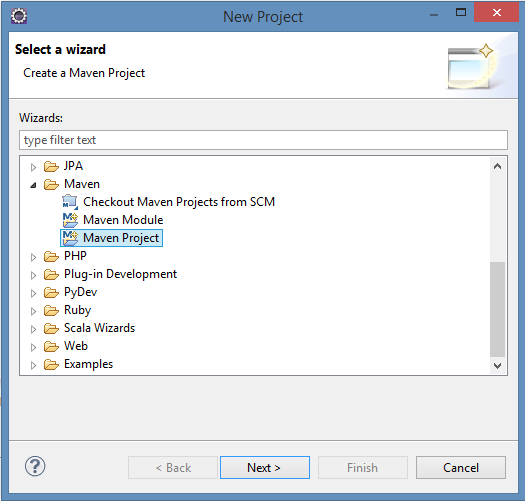
Click on Next
Step 3: Define New Maven Project Location
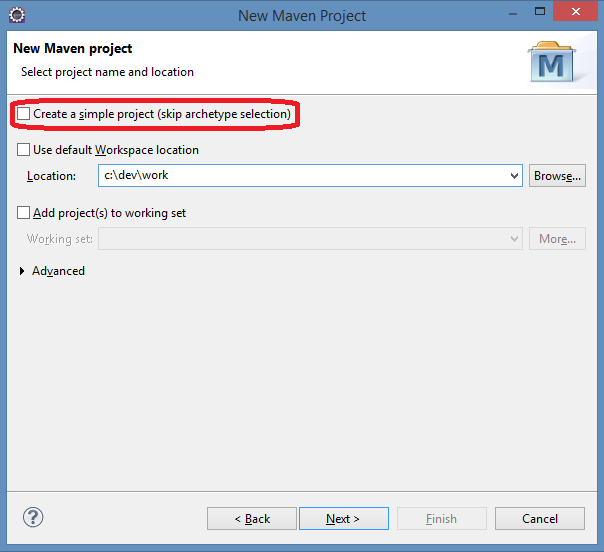
Make sure the highlighted check box is unchecked and click on Next
Step 4: Select Archetype
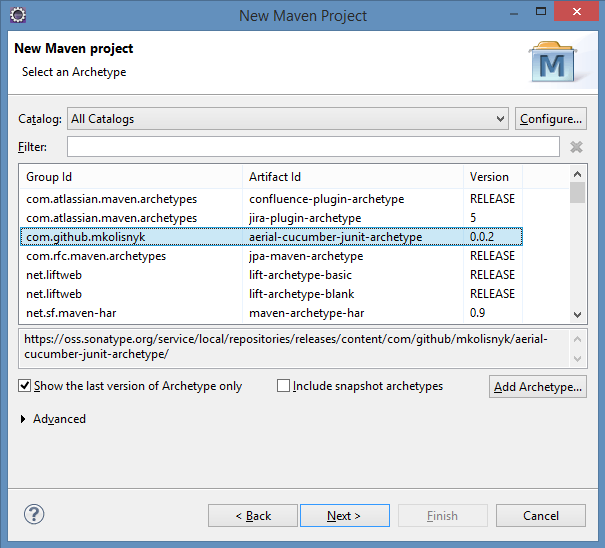
Click on Next
Step 5: Fill in Archetype Parameters
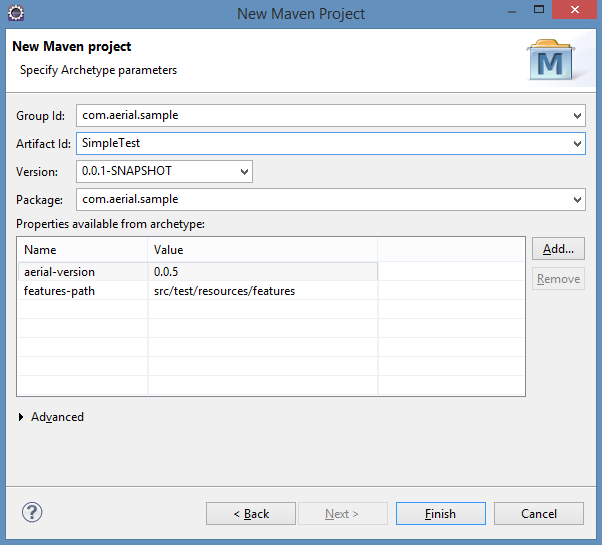
Click on Finish
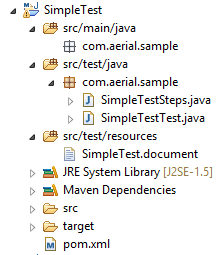
Step 6: View Project Structure